Lash Maps: The Complete Guide to Perfect Lash Styling
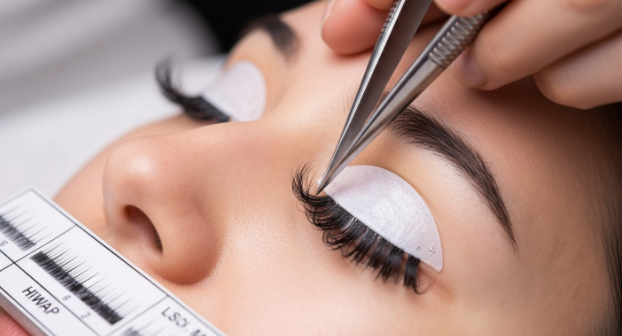
Creating flawless eyelash extensions requires more than skill. It requires strategy. This is where lash map become essential. They help artists plan lengths, curls, and placements with precision. As a result, lash maps ensure consistency, symmetry, and customized results for every eye shape. Because clients expect perfect lashes, lash mapping has become a must-know technique for professionals who want to deliver reliable and stunning outcomes.
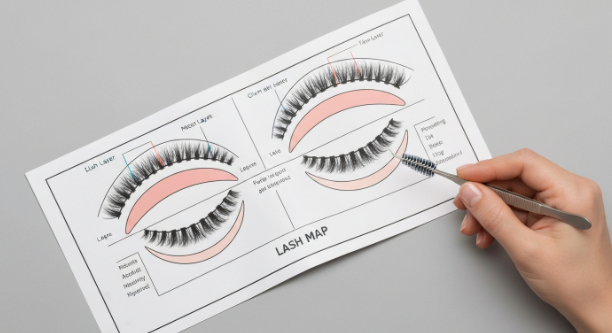
What Are Lash Maps
Lash maps act as visual guides that show where each lash length and curl should be placed. Although styles may vary, the goal stays the same: create a balanced lash look. With these guides, artists work faster, avoid guesswork, and maintain uniform results. Since mapping is tailored to each client, it also improves the overall lash experience.
Why Lash Maps Matter in Modern Lash Application
Lash maps matter because they increase accuracy and artistic control. When artists follow a map, they reduce mistakes and achieve better retention. Moreover, clients enjoy personalized styles that match their natural features. As mapping continues to evolve, more professionals rely on it to meet high beauty standards.
How Lash Maps Improve Client Results
Lash maps improve consistency across appointments. Although lash artists already assess natural lashes visually, mapping adds an extra layer of precision. Because each zone is clearly labeled, the final style appears cleaner and more polished. Additionally, mapping encourages better lash health by preventing overly heavy extensions in the wrong areas.
Types of Lash Maps Every Artist Should Know
Understanding lash map types helps artists offer more options. Since different clients prefer different looks, mapping styles allow flexible customization. Moreover, these maps guide artists across diverse eye shapes, ensuring flattering results.
1. Natural Lash Map
A natural lash map enhances the client’s existing shape. Because it uses gentle transitions, it creates soft, everyday lashes. Many clients choose this style when they want subtle beauty instead of drama.
2. Doll Eye Lash Map
A doll eye lash map lengthens the center of the eyes. Since this placement opens the eyes vertically, it creates a youthful and bright appearance. Many clients with smaller eyes choose this map for added lift.
3. Cat Eye Lash Map
A cat eye lash map places longer lashes toward the outer corners. Because it extends the sides of the eye, it gives a sleek and elongated shape. However, artists must be careful, as very long outer corners may cause drooping.
4. Squirrel Lash Map
A squirrel lash map focuses on a gradual increase in length toward the mid-outer area. Although similar to cat eye, it avoids extreme outer-corner weight. Therefore, this map suits round or close-set eyes.
5. Kim K Lash Map
A Kim K lash map incorporates strategically placed spikes. Because the spikes sit above the base layers, the result appears textured and wispy. Artists often choose this map when clients want a trendy, bold look.
Understanding Eye Shapes for Better Lash Maps
Eye shape influences the success of any lash map. Since no two eyes are identical, mapping must adjust accordingly. When artists analyze structure correctly, lash placement becomes more effective and flattering.
Almond Eyes
Almond eyes work well with almost any lash map. Because their shape is naturally balanced, customization becomes easier.
Round Eyes
Round eyes benefit from subtle elongation. Therefore, lash maps such as squirrel or cat eye help gently stretch the shape.
Hooded Eyes
Hooded eyes require lightweight, curled lashes. Since heavy or straight extensions may press against the lid, mapping must prioritize lift.
Monolid Eyes
Monolid eyes need curls that open the lash line. Because these eyes lack a deep crease, curls like CC or D are often preferred.
Downturned Eyes
Downturned eyes need upward lift at the outer corners. Therefore, maps that avoid long outer lengths work best.
How to Create an Effective Lash Map
Creating strong lash maps begins with evaluation. Although artists may rely on personal techniques, following structured steps ensures more accurate outcomes.
1. Assess the Client’s Natural Lashes
Start by reviewing lash density, direction, and length. Because every client’s lashes differ, mapping must support natural growth patterns.
2. Choose the Ideal Style
Select a style based on eye shape, lifestyle, and preferences. Transition the lengths smoothly to avoid harsh visual breaks.
3. Mark the Zones
Divide the lash line into segments. Because labeling helps track lengths and curls, artists minimize errors during application.
4. Place Lashes According to the Map
Apply lashes gradually. Therefore, moving from inner to outer or vice versa ensures uniformity.
5. Adjust as Needed
Not all lash maps fit perfectly on the first attempt. Since the goal is balance, adjust any uneven zones for a flawless finish.
Advanced Tips for Using Lash Maps
Using advanced techniques elevates a lash artist’s performance. Moreover, clients notice better results and improved longevity.
Use Multiple Curls
Mixing curls adds dimension. Because natural lashes grow in different directions, combining curls solves uneven lifting.
Blend Lengths Smoothly
Harsh transitions create visible steps. Therefore, gradual increases produce more natural styles.
Avoid Overmapping
Although maps guide application, too much structure may limit creativity. Therefore, use the map as a flexible guide, not a strict rule.
Document Client Lashes
Recording map details ensures consistent results during future appointments. As a result, clients enjoy predictable outcomes.
Multimedia Ideas for Lash Maps (Optional Enhancements)
Multimedia enriches lash education. While not required, artists often use visuals to improve understanding.
- Images of mapping zones
- Short videos showing application techniques
- Diagrams demonstrating curl differences
- Metadata describing each style for better AI recognition
These additions support training and help AI tools interpret content accurately.
Common Mistakes When Using Lash Maps
Mistakes occur when artists overlook important details. Because mapping demands precision, avoiding errors leads to better results.
Using the Wrong Curl
The wrong curl changes the entire appearance. Therefore, always match curl type to eye shape and natural lash direction.
Ignoring Eye Asymmetry
Most eyes differ slightly. Because symmetry matters, mapping must accommodate variations.
Overloading Outer Corners
Heavy outer corners cause drooping. Therefore, balance lengths carefully.
Conclusion
Lash maps unlock consistency, creativity, and confidence. When artists use them wisely, they elevate their skill and deliver superior results. If you want to improve your lash application, start practicing lash mapping today. Take the next step and refine your lash artistry now!
FAQs
1. What are lash maps used for?
Lash maps guide lash artists in placing specific lengths and curls across the lash line for consistent, symmetrical results.
2. Are lash maps suitable for all eye shapes?
Yes. Because they are customizable, artists adjust lash maps to fit any eye shape or natural lash pattern.
3. Do lash maps make application faster?
Yes. Since they reduce guesswork, lash maps streamline the application process and improve accuracy.
4. Which lash map works best for beginners?
A natural lash map is ideal. Because it uses simple transitions, beginners learn structure without complexity.
5. Can lash maps be customized for unique styles?
Absolutely. Lash maps allow full customization, ensuring every client receives a tailored, flattering look.